Learning Context/ Introduction
In this Learning Experience, students create their own artistic interpretations of the Mona Lisa.
The Mona Lisa Project evolved as a result of a common district theme for the Art Department. This activity culminated in a gallery exhibit showing the developmental stages of interpretation from kindergarten through high school.
This particular lesson's focus is the middle school.
Since our district has a K-12 Art Curriculum in-place, I knew students were coming to me with certain skills of scope and sequence. Students already had knowledge of:
- the elements and principles of design
- mixing and blending of color
- watercolor and tempera application skills
- drawing skills - gesture and contour
- painting styles
In all art activities, interdisciplinary work is woven in whenever possible. For this lesson, the science department involves children in the Invent America Program and studies the inventions of Leonardo da Vinci to motivate and encourage higher-level thinking. In addition, the foreign language department offers Italian and studies the life of Leonardo da Vinci to familiarize students with his style of painting and period of history.
Duration
Planning Two hours
Teacher is responsible for having books, slides, and/or reproductions of Mona Lisa and Leonardo da Vinci. The teacher should determine how expansive or how limited the range of materials should be for this project and have the materials available.
Complete bulletin boards
Implementation
Teacher/class discussion/slide presentation of Leonardo da Vinci and Mona Lisa, as well as explanation of the project and review of the information:
1 class session - 45 minutes
work sessions - 5-7 class sessions
critique/assessment/display - 1 45 minute session
Instructional/Environment Modifications
Since teacher introduction of this lesson includes slide presentations, displays, verbal instructions and demonstration, all types of learning styles are taken into consideration.
This project allows for flexibility in degree of advancement and achievement level. Students work with material with which they are comfortable. Projects can be as simple or as complex as ability level allows.
This project helps students translate a concept into a project.
Physical modifications can include rearranging work areas for two or three pupils to work together.
More advanced classes can incorporate a research unit, oral presentation, or written assignment (i.e. Was Leonardo da Vinci "dyslexic" or "secretive" when he kept a journal written backwards?).
Procedure
The teacher organizes the material to be used for this project (sketch paper, paint, brushes, etc.). The teacher divides the class into small groups for the purpose of discussion of this project.
The conversation begins through discussion and the viewing of slides. The teacher asks such motivating questions as:
- Why is the Mona Lisa so well known?
- Who is Mona Lisa?
- How would you describe her face?
The teacher continues to dialog with the students, this time on Leonardo da Vinci. It includes his life style, talent, and genius as an artist, poet, inventor, mathematician, sculptor, architect, etc.
The room is replete with books, illustrations, prints, and posters on Mona Lisa. The bulletin boards reflect the life and work of Leonardo da Vinci.
The teacher arranges computer time for the class for research and project development.
The teacher/students discuss their artistic interpretation of the Mona Lisa. Questions posed for them to ponder include:
- What do you think Mona Lisa looked like when she got up in the morning?
- What do you think Mona Lisa did all day?
- What do you think Mona Lisa was thinking?
- What kind of personality do you think she had?
Students make pencil sketches of their ideas and discuss them with the teacher. If they wish, students may work in pairs or individually. They determine how to translate their ideas into an art form.
Each group/person makes a list of materials they will need and gathers them. They execute the technique they have selected (painting, collage, sculpture, etc.) The work is titled and framed.
Upon completion of all projects, there is a general critique session and teacher/student assessment of the work.
Student Work
Resources
For students:
- Bristol board, pencil, sketch paper, erasers
- Painting materials (tempra paint, water colors, brushes, water trays and painting trays)
- Collage material (collected as needed) white craft glue, fabric, yarn, glitter, styrofoam, glitter, etc.
- Mod Podge (optional) [seals picture and makes it shine]
- Colored pencils
For the teacher:
- visual art material (slides, books, reproductions, etc.)
- assessment - scoring and reflection sheets
- bulletin board visuals (construction paper, stapler, reproductions, pictures, biographical material, fact sheets, etc.)
- have above student material collected and accessible for student use
Assessment Plan
Support Materials:
Student Guide For Critiquing WorkDefinition of Assessment RubricVisual Art Self and Peer Assessment FormAssessment RubricTeacher-Student Assessment FormGuidelines for Artist Research PaperAdditional Background Information
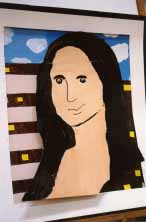
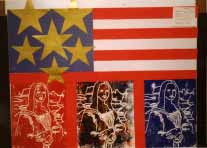
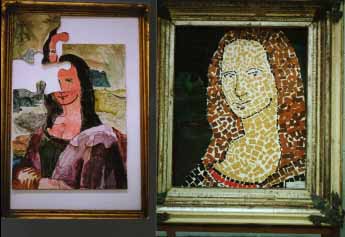
Student Work
Selected Examples:
Author
Diana Roda, Hendrick Hudson School District
Reflection
This is a wonderful hands-on project for all types of learners. The project allows a comfort zone for students to follow a simple format or work on a more elaborate concept and skill level.
Children learn from each other and share ideas watching a variety of techniques being used. Computer graphics are also a vehicle for the student who is more proficient in this field.
The use of Multi-media in the classroom allows for more individual competence and creativity with competitiveness. The finished product offers a variety of material, techniques, size framing, and freedom reflecting 20th century ideas.
Several students experienced difficulty during this series of lessons, but quickly learned how to transpose a mistake into an artistic opportunity:
- One student had been working on a clay head of Mona Lisa for days. When he came to show me his work, it slipped off the turntable and fell to the floor. The whole right side was flattened. The class quickly gathered around to observe, comfort and joke about the flattened piece.
SOLUTION: The clay head was put behind a piece of glass with the "flattened nose" pressed firmly against the window and titled, "Mona Lisa Looking at the 20th Century".
- Another student was having difficulty painting the face of Mona Lisa. Before I could assist, he had taken a utility knife and cut out the entire face leaving a huge hole in the painting.
SOLUTION: The student held the painting up to his face and became Mona Lisa. New title: Mona "Me".
This was one of the most successful study units offered to students. The enthusiasm and energy level never seemed to wane.
The title of the project work became almost as important as the piece itself. The end results were artistically and individually satisfying.

